How To Install 3 Way Switch Wiring - Leviton 3 Way Motion Switch Wiring Diagram Download : Take a closer look at a 3 way switch wiring diagram.. Connect 3 wire cable in the first switch box. It's easier than you might think. With the three neutral wires spliced together, attach the other end of the jumper wire to the wh terminal on the switch. The 3 wire cable enters through the top of the first switch box. The switch should be available at your local hardware store.
From lighting to electrical panel upgrades, no job is too big/small. Of the three bilge pump switches the only one that's not extremely simple is the backlit auto/manual bilge pump switch. The switch should be available at your local hardware store. Proconnect guarantee, professional background checked pros, upfront & transparent pricing! As always, please consult a certified electrician if you have any question.
How To Install A 3 Way Dimmer With New Wiring Diagram Power At Switch - Database - Wiring ... from cnet2.cbsistatic.com Pick the diagram that is most like the scenario you are in and see if you can wire your switch! Of the three bilge pump switches the only one that's not extremely simple is the backlit auto/manual bilge pump switch. The switch should be available at your local hardware store. This might seem intimidating, but it does not have to be. Connect the wire marked common to the black or dark colored screw. Proconnect guarantee, professional background checked pros, upfront & transparent pricing! Of insulation from the end of each wire, then connect the wires following figure b and photo 5. It's easier than you might think.
(learn more about how our awesome backlit switches work here) even that one is still pretty straight forward though, here are some diagrams that show the single jumper required on the back of the switch.
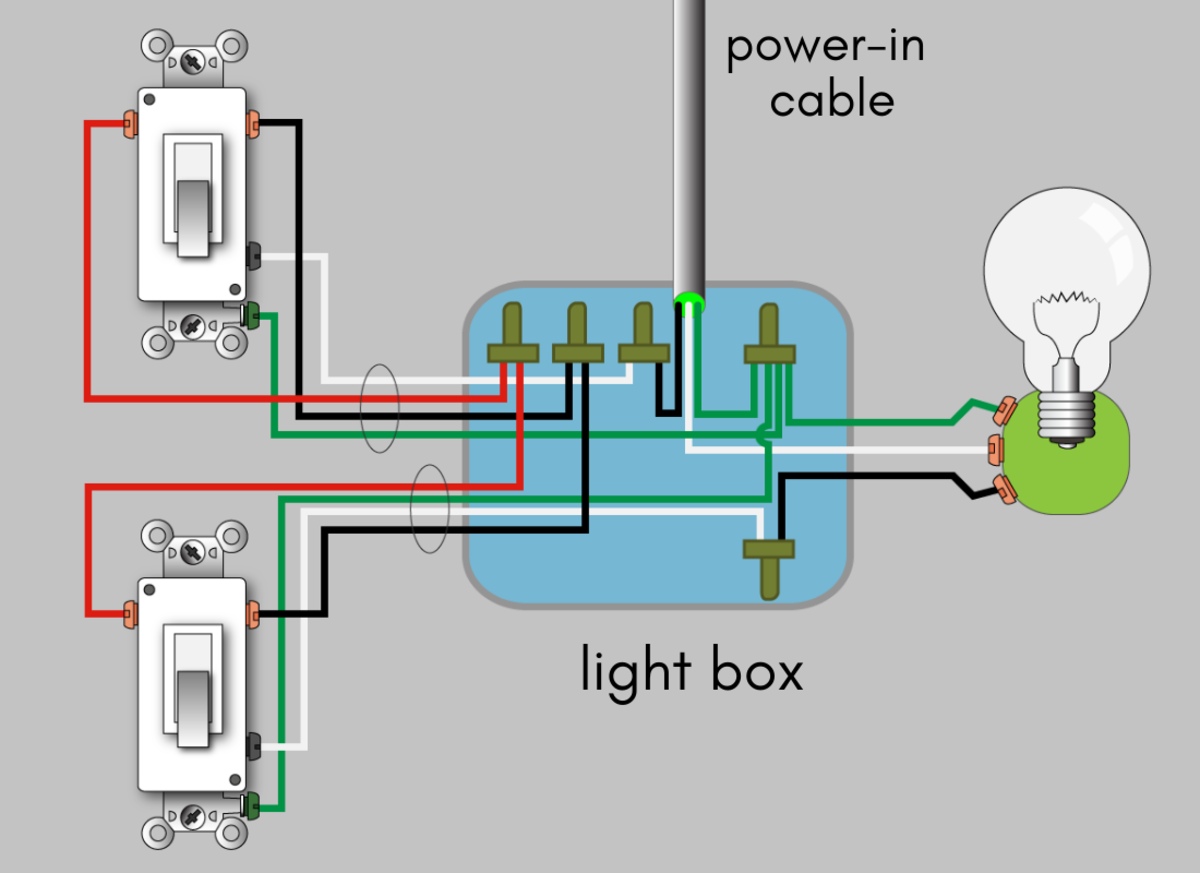
With the three neutral wires spliced together, attach the other end of the jumper wire to the wh terminal on the switch. How to wire a three way light switch. 3 way switch wiring diagram. The switch should be available at your local hardware store. It's easier than you might think. Of insulation from the end of each wire, then connect the wires following figure b and photo 5. From lighting to electrical panel upgrades, no job is too big/small. The other two wires can attach to either of the identical terminals. This switch should be installed in the main occupied or traffic location. Connect 3 wire cable in the first switch box. Therefore, the 2 switches + the light = 3 way. To do this, the opening steps (getting ready and assembling tools) remains the same. The power wire, the neutral wire, and the traveller or switch wire.
Connect the two remaining traveler wires to the two brass or light colored screws. Connect the wire marked common to the black or dark colored screw. (learn more about how our awesome backlit switches work here) even that one is still pretty straight forward though, here are some diagrams that show the single jumper required on the back of the switch. Proconnect guarantee, professional background checked pros, upfront & transparent pricing! The power wire, the neutral wire, and the traveller or switch wire.
electrical - How do I wire three 3-way switches in one gang box to three switches in another box ... from i.stack.imgur.com Proconnect guarantee, professional background checked pros, upfront & transparent pricing! Connect the two remaining traveler wires to the two brass or light colored screws. The switch should be available at your local hardware store. This switch should be installed in the main occupied or traffic location. It's easier than you might think. From lighting to electrical panel upgrades, no job is too big/small. Clamp the first electrical box to the wall. The cable should also have a ground wire, or a total of four wires in the cable.
Connect the ground wire to the green screw.
The switch should be available at your local hardware store. Proconnect guarantee, professional background checked pros, upfront & transparent pricing! The 3 wire cable enters through the top of the first switch box. If you want to go another way you can. Connect the ground wire to the green screw. From lighting to electrical panel upgrades, no job is too big/small. Let us show you how. As always, please consult a certified electrician if you have any question. It's easier than you might think. The master switch requires a line (110vac with neutral and ground) and load. With the three neutral wires spliced together, attach the other end of the jumper wire to the wh terminal on the switch. Connect the wire marked common to the black or dark colored screw. With these diagrams below it will take the guess work out of wiring.
Connect 3 wire cable in the first switch box. The line feed wire marked with tape attaches to the bk terminal. The power wire, the neutral wire, and the traveller or switch wire. The other two wires can attach to either of the identical terminals. Connect the wire marked common to the black or dark colored screw.
A 3 Way Switch Wiring Diagram For Hubbell - Wiring Diagram Networks from usercontent2.hubstatic.com It's easier than you might think. The black electrical tape on the white wire indicates that it's a hot rather than a neutral. The other two wires can attach to either of the identical terminals. To do this, the opening steps (getting ready and assembling tools) remains the same. As always, please consult a certified electrician if you have any question. Connect the wire marked common to the black or dark colored screw. If you want to go another way you can. Connect 3 wire cable in the first switch box.
Traditionally, the slave requires a line and traveler wire to the master.
Connect the two remaining traveler wires to the two brass or light colored screws. The master switch requires a line (110vac with neutral and ground) and load. With the three neutral wires spliced together, attach the other end of the jumper wire to the wh terminal on the switch. This switch should be installed in the main occupied or traffic location. The other two wires can attach to either of the identical terminals. From lighting to electrical panel upgrades, no job is too big/small. Connect the wire marked common to the black or dark colored screw. The power wire, the neutral wire, and the traveller or switch wire. To do this, the opening steps (getting ready and assembling tools) remains the same. This might seem intimidating, but it does not have to be. Traditionally, the slave requires a line and traveler wire to the master. If you want to go another way you can. With these diagrams below it will take the guess work out of wiring.